'Man - Sewing' with Guy from Brother Sewing UK, Part One
Recently I welcomed a baby Niece into the world. Within a few months, I was asked: "Can you get someone to make a quilt from baby grows she's grown out of?". Never one to shy away from trying something new and given the fact I've been working with Brother Sewing Machines for over 10 years, I had to give it a go. So, armed with my Innov-is VQ2 long-arm quilter, and some other bits and bobs I ventured into the Quilting unknown...
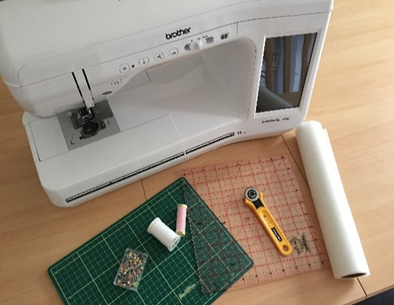
Chatting to colleagues and doing a little research, I realised I would need some key tools.

Using the cutting mat and rotary cutter, I cut the arms and legs away from the body of the baby grow. This gives the most usable piece of fabric for the quilt - with no seams, buttons or press studs to get in the way. Babygrows are generally made from very stretchy fabric. This can make it difficult when sewing squares together and also when washed, they may pull away from each other, causing the quilt to stretch and curl up.

To minimise this, I used a Floriani iron-on embroidery backing (available from LordsSewing.co.uk). At this stage, I needed to decide the size of the quilt. I wanted it to be approx. 52 inches (1.3m) long, by 32 inches (82cm) wide, and I wanted the quilted squares to be fairly small - but not too small to make the quilting very difficult. So I decided upon squares of 4 x 4 inches. To make my entire quilt, I would need 104 square pieces. To work this out, divide the size of your quilting square into the length and width of your final quilt size (52/ 4 = 13 & 32/ 4 = 8. Then 13 x 8 = 104). Now, don't forget, you must remember to add a 1/4 inch seam allowance to every side of each square. This effectively meant I needed each square to be 4.5 x 4.5 inches.

Using the rotary cutter and cutting ruler, I cut the required number of squares of iron on backing.

Each square was then ironed to the underside of the baby grow. Depending on the size of the baby grow, you may be able to get 2 or more squares. Ensure the iron-on-backing is well bonded to the baby grow fabric - this will ensure the fabric stays firm when sewing.

Allow the iron-on-backing to completely cool, and then, using the cutting ruler cut the squares of iron-on-backing on each side….

….leaving perfect squares of fabric, that are securely bonded to the iron-on-backing. I needed to do this 104 times!

When you have done this for enough pieces to create your quilt, lay them out on a large flat surface, so that you can position them exactly where you want them.

The easiest way I found to then remember where each square should be, is to pile up each row of squares to the right-hand side. One piece on top of the other.
In the next part of the blog, I will explain how to sew the pieces together and begin to make your final quilt.

Chatting to colleagues and doing a little research, I realised I would need some key tools.
- A good sewing machine - if you're creating a large quilt, one with a long-arm is better (I'm using the Brother Innov-is VQ2).
- A cutting mat
- A rotary cutter for cutting the fabric
- A cutting ruler
- Some key sewing feet - including 1/4 inch foot, walking foot or dual feed foot, stitch in the ditch foot.
- Some iron-on-backing may be needed.
- Some good quality branded sewing or quilting thread

Using the cutting mat and rotary cutter, I cut the arms and legs away from the body of the baby grow. This gives the most usable piece of fabric for the quilt - with no seams, buttons or press studs to get in the way. Babygrows are generally made from very stretchy fabric. This can make it difficult when sewing squares together and also when washed, they may pull away from each other, causing the quilt to stretch and curl up.

To minimise this, I used a Floriani iron-on embroidery backing (available from LordsSewing.co.uk). At this stage, I needed to decide the size of the quilt. I wanted it to be approx. 52 inches (1.3m) long, by 32 inches (82cm) wide, and I wanted the quilted squares to be fairly small - but not too small to make the quilting very difficult. So I decided upon squares of 4 x 4 inches. To make my entire quilt, I would need 104 square pieces. To work this out, divide the size of your quilting square into the length and width of your final quilt size (52/ 4 = 13 & 32/ 4 = 8. Then 13 x 8 = 104). Now, don't forget, you must remember to add a 1/4 inch seam allowance to every side of each square. This effectively meant I needed each square to be 4.5 x 4.5 inches.

Using the rotary cutter and cutting ruler, I cut the required number of squares of iron on backing.

Each square was then ironed to the underside of the baby grow. Depending on the size of the baby grow, you may be able to get 2 or more squares. Ensure the iron-on-backing is well bonded to the baby grow fabric - this will ensure the fabric stays firm when sewing.

Allow the iron-on-backing to completely cool, and then, using the cutting ruler cut the squares of iron-on-backing on each side….

….leaving perfect squares of fabric, that are securely bonded to the iron-on-backing. I needed to do this 104 times!

When you have done this for enough pieces to create your quilt, lay them out on a large flat surface, so that you can position them exactly where you want them.

The easiest way I found to then remember where each square should be, is to pile up each row of squares to the right-hand side. One piece on top of the other.
In the next part of the blog, I will explain how to sew the pieces together and begin to make your final quilt.
Comments
Post a Comment